Hardwood floors are a stunning feature in any home, but over time, even the most beautiful wood can lose its luster. One way to bring your floors back to life—or give them a brand-new look—is through staining. Staining can change the color, highlight the grain, and create a rich, polished look. Whether you’re tackling this project on your own or thinking about hiring a flooring contractor in Portland, ME, knowing the proper techniques will help you achieve long-lasting, professional results.
1. Prepping the Floor: The Foundation of a Good Stain
The first and most important step to staining hardwood is surface preparation. This process involves sanding down the wood to remove the old finish and create a clean, smooth canvas for the stain.
Sanding the Floor
Start by using a drum sander with coarse-grit sandpaper (usually around 36 to 40 grit) to strip away the old finish and level any uneven areas. Then, switch to a medium grit (around 60 to 80 grit) to smooth out the surface. Finish the sanding process with fine-grit sandpaper (100 to 120 grit) to ensure the wood is silky smooth and ready to accept the stain evenly.
Tip: Be sure to sand along the grain of the wood to avoid scratches. Avoid skipping grits in the process as this can result in an uneven surface.
Cleaning the Dust
After sanding, it’s crucial to clean the floor thoroughly. Dust and debris can ruin the finish if they get trapped under the stain or sealer. Use a vacuum with a brush attachment to get rid of dust, and then go over the surface with a tack cloth to pick up any remaining particles. Take your time here—this step will make or break the final result.
2. Choosing the Right Stain Color: Set the Mood of Your Space
The stain color you choose can drastically change the mood and feel of a room. Light stains like oak or maple create a bright, airy atmosphere, perfect for modern or minimalist spaces. Darker stains, such as walnut or mahogany, add warmth and richness, ideal for more traditional or rustic homes.
Testing the Stain
Before you commit to a stain color, test it on a small, inconspicuous section of the floor. Different wood species absorb stain differently, so testing allows you to see how the stain interacts with your specific floor. Look at it in various lighting conditions to ensure it matches your vision.
Tip: Keep in mind that the finish coat (such as polyurethane) can slightly change the color by adding gloss or depth, so factor that into your decision.
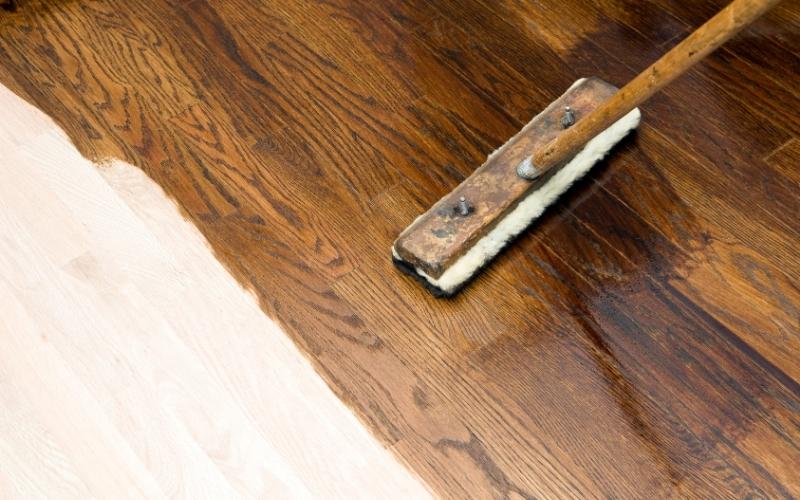
3. Applying the Stain: Technique for a Smooth, Even Finish
Once you’ve chosen your stain, it’s time to apply it. But don’t rush—proper technique is key to achieving a beautiful, even finish.
Tools for Application
The most common tools for applying stain are rags, foam brushes, or paint pads. A rag allows for more control and helps avoid brush marks. However, for larger areas, a foam brush or paint pad may speed up the process. Make sure to work in sections, applying the stain with the grain of the wood.
Wiping Off Excess Stain
After applying the stain, allow it to sit for about 5 to 15 minutes (depending on how dark you want the color). Then, use a clean rag to wipe off the excess. Wiping is crucial—leaving too much stain on the surface can cause the wood to look blotchy or sticky once it dries.
Tip: If you want a deeper color, you can apply multiple coats. Just be sure to allow enough drying time between coats (usually 24 hours).
4. Sealing the Floor: Protecting Your Work
Once your stain has fully dried, the next step is to apply a protective sealer. Staining the wood only provides the color—sealing it protects that color and ensures the floor holds up against wear and tear.
Types of Sealers
There are different types of sealers to choose from:
- Polyurethane: A popular choice, polyurethane provides a durable, long-lasting finish and is available in satin, semi-gloss, or high-gloss sheens. It’s perfect for high-traffic areas.
- Oil-based sealers: These are more traditional and add warmth to the wood but take longer to dry.
- Water-based sealers: These dry faster and don’t yellow the wood as much as oil-based sealers, making them ideal for light stains.
Tip: Apply at least two coats of sealer, lightly sanding between each coat to smooth out imperfections. Use a fine-grit sandpaper (around 220 grit) to scuff the surface before the second coat for optimal adhesion.
5. Drying and Curing: Patience Pays Off
After you’ve applied your sealer, you’ll need to wait for the floor to dry fully before walking on it. Depending on the type of sealer and humidity levels, drying times can vary. For most polyurethane finishes, you’ll need to wait 24 to 48 hours before light use and up to 7 days for full curing.
Tip: Avoid placing heavy furniture or rugs on the floor until it has completely cured. This will prevent dents, scratches, or smudges from forming in the fresh finish.
6. When to Call a Flooring Contractor
While staining your own hardwood floors can be a rewarding DIY project, it’s not for everyone. If you’re dealing with a large area, uneven floors, or just don’t have the time, hiring a professional flooring contractor in Portland, ME might be the way to go. They have the expertise to ensure the job is done correctly and efficiently, with minimal disruption to your home.
Benefits of Hiring a Professional
- Experience: Professionals know how to handle various types of wood, stains, and sealers, ensuring the best possible results.
- Equipment: They have access to high-quality sanders, stain applicators, and vacuums that ensure a flawless finish.
- Time-Saving: What could take you a weekend (or more) might only take a contractor a day or two, allowing you to enjoy your new floors sooner.
Final Thoughts
Staining your hardwood floors can completely transform the look and feel of your home. Whether you’re going for a dramatic dark stain or a light, natural finish, following the right steps is essential for achieving a smooth, even look that will last for years. If you’re in doubt or just want peace of mind, don’t hesitate to contact a hardwood flooring contractor in Portland, ME to take the hassle out of the process. Whichever route you choose, with the right techniques and attention to detail, your floors are sure to look amazing!